So, I pulled out my Barbara Walker Stitch Treasuries and my graph paper and got to work. I decided to plan a scarf using the Rose Trellis Lace pattern, and I swatched and swatched and swatched - not to pick out the proper needles to fit the yarn I had selected, oh no, I swatched and swatched in order to learn how to knit this lace! It's a head scratcher - at least, it is for me. I learned lots of valuable lessons about planning your graph, and I'll discuss those in a minute. First, let's discuss short rows with a garter stitch border.
I noticed is that the garter stitch edging takes up less vertical space than the lace in the middle, so I need to add an extra row of garter stitch every now and then, such that the sides aren't shorter than the middle. Way back, when I began knitting Christmas Mitts (dig around below somewhere), I learned a nifty little trick for that pesky wrap-and-turn.
If you wrap-and-turn like some books tell you to, you end up with an odd little noose around the wrapped stitch, and an odd little hole, neither of which are very appealing to me. If you wrap and turn, then on the way back, pick up the noose, then the noose is much smaller than the stitch, and it is less than perfect, too. Here is a way to wrap and turn on your short rows, which comes out perfect every time.
As you might have noticed, I have a love affair with my little camera, so indulge me in quite a few photos. I could have bigger faults, really, I could.
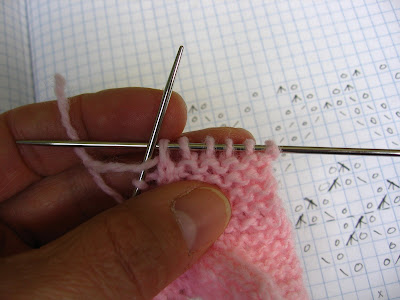
Here, I've knitted across the 5 edge stitches, anxiously awaiting the short row manuever.


You might be extra-observant and you might have noticed that the stitches of the body of the lace are mounted in a way which some of you knitting-snobs might consider to be backwards. Well, I'm here to say that they are not backwards, they are just different from what some of you might expect. See Annie Modesitt's webpage for an excellent description of "combination" knitting. It's a way of purling without killing your hands, and I love it and refuse to change and I know how to read my knitting and all is well in the world!
Sorry, I digress. Ahem! Back to our lesson. Below, you can see that I’ve knitted across the 5 garter stitch stitches, and I'm ready to knit the wrapped one. It's very simple - just insert the needle into the front of the knit stitch (which means that because of the way that the stitch is mounted, I'll stick my needle into this pair of stitches as though I've done a ssk - I'll go in from the right side of the stitch. Some of you might like to say that this is knitting into the back of the stitch, but really, it isn't the back, it's the front. Oh, no, here I go again, lol.)
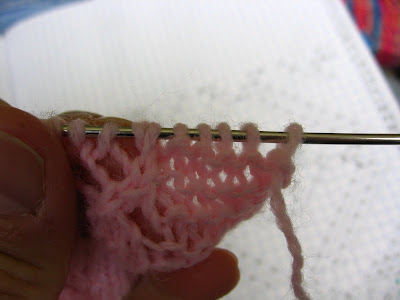
Here is what it looks like from the back. You can hardly see the wrap and turn, eh?
Can you see the other short rows? Of course, you can't, but they are there, lol.
The Rose Trellis design is written out - not charted - in the Barbara Walker book. I don't do well with written descriptions because I make so many stinkin' mistakes, and if the pattern is written, I can never figure out where I went wrong. So, I decided to take the time to chart it out. Another good thing about charts is that you can chart out many repeats of the pattern, and see how it all goes together.
OK, so I spend All Day Long charting out this pattern, only to discover that it's already been done and it's available for all to see, just by following this link, and printing it out for yourself.


http://toknitisdivine.ca/files/Travelling_Roses.pdf Didn't she do a lovely job on her scarf?
I'm glad that I spent the time charting it out for myself, though, as I feel that I learned a lot.
I wrote the knit pattern symbols in black, in fairly standard knitting short hand - circles for yarn overs, slanted lines for single decreases, three lines in a sort of a triangle-ish form for double decreases. Only the pattern rows are indicated, the "wrong side" stitches are purled. I put little red dots in the pattern, to indicate where the lace pattern repeats. This is a very helpful notation, too.
Then, on the bottom of the chart - the first repeat actually, as I graphed out two full repeats - I wrote the number of stockinette stitches in green. I thought that this would help me while knitting to be able to see at a glance that I'm to knit 9 plain knit stitches here, and 7 there and so on. When I worked on my swatch, I found this to be true. It really helps! 
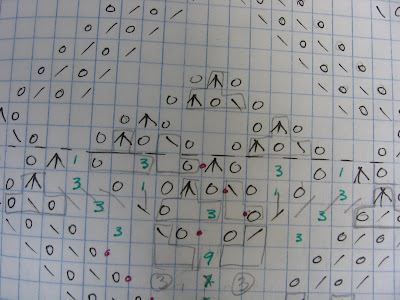
So, in the photo above, you see the uppermost penciled box? This shows me that the double decrease in the row at the top of the box involves one single decrease, one yarn over, and one double decrease, which you can see in the bottom of the penciled box. If I get to the place where this double decrease needs to be made, and the three stitches on the left hand needle aren't what I expect them to be, then I've counted wrong, or I've left out a yarn over on the row below or something, but
I'M NO LONGER LOST!!!
This is a wonderful thing. If lace has been giving you fits, then maybe you would like to try this little trick?
In the photo below, you can see some diagonal pencil markings - these connect the knit stitches. You'll see three diagonal lines, marked in the left of center - see them? They are associated with the green "3" - this tells me that the first knit stitch in this set of three knit stitches should be knitting another knit stitch - not a yarn over. I should knit my three stitches, then make a yarn over, then knit one - and this knit one should be in the decrease from the row below (actually, it's from two rows below, but it helps to think of it this way).

All of you experienced lace knitters are probably rolling your eyes, but this was a true learning moment for little old me.
~~~~~~~~~~~~~~~~~~~~
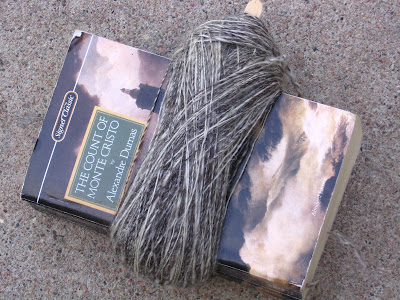
On other thoughts- a little spinning progress. Some Lincoln, which you see, ready to ply. I've already plyed it and washed it and it came out much better than I had expected. The roving was rather dirty, which made it and the single rather rough and scratchy, but it's nice and clean and soft, now. Pix in a few days.
Am I the only one who finds Tulips to be ridiculously photogenic? I can't stop myself!


3 comments:
I'm going to have to check out that combination knitting for the purling.
Yes, I need to chart out my current lace project....simple, that it is, but I've learned I like knitting from charts better than words.
BEAUTIFUL flowers.
Catherine Devine has a Rose Trellis pattern shawl available, and the pattern is charted there too:
http://cdevine.typepad.com/photos/lace_work/rosetrellisl.html
My first posting....Beautiful flower pictures, it's so nice tobe done with winter weather. And thanks for the wonderfully detailed "tutorial" on the wrap and turn. I love lots of pics and your enplanations are clear and detailed. THANKS Jan from Pajama Jam
Post a Comment